Prolia® Storage and Injection
Storage
- Store Prolia in a refrigerator at 2° to 8°C in the original carton. Do not freeze.1
- If removed from the refrigerator, Prolia should be kept at controlled room temperature (up to 25°C) in the original carton and must be used within 30 days.1
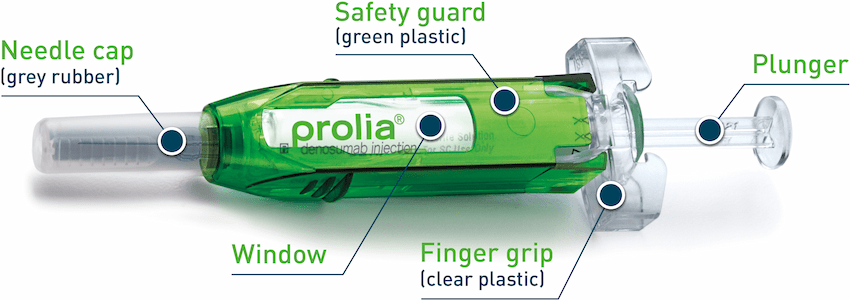
- Prolia comes in a dispensing pack containing one single-use prefilled syringe with a safety guard.1
Note to Healthcare Professionals The prefilled syringe of Prolia has a safety guard.
Please do not engage the green safety guard prior to injecting Prolia.
Injection
Administration of Prolia should be performed by a healthcare professional, by a trained injector, or a patient may self-inject if a healthcare professional determines that is appropriate.
Step 1 – Prepare
Remove the syringe tray from the carton. On a clean, well-lit surface, place the syringe tray at room temperature for 15-30 minutes before you give an injection.
- Do NOT use the prefilled syringe if the carton is open or damaged.
- Do NOT try to warm the prefilled syringe by using a heat source such as hot water or microwave.
- Do NOT leave the prefilled syringe in direct sunlight.
- Do NOT shake the prefilled syringe.
- Do NOT remove the grey needle cap until you are ready to inject.
- Do NOT slide the green safety guard over the needle before you give the injection. This will “activate” or lock the green safety guard. Use another syringe that has not been activated and is ready to use.
- The prefilled syringe is not made with natural rubber.
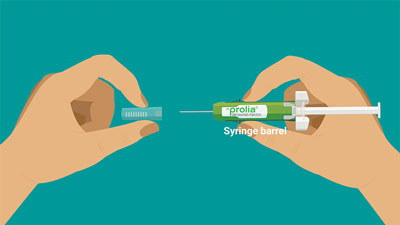
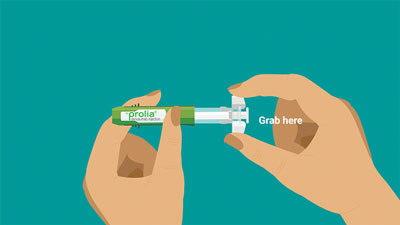
Open the tray by peeling away the cover. Grab the green safety guard to remove the prefilled syringe from the tray.
For safety reasons: Do NOT grab the plunger rod or the grey needle cap.

Always hold the syringe by the syringe barrel.
Make sure the medicine in the
prefilled syringe is clear and colourless to pale yellow.
Do NOT use the prefilled syringe if:
- The medicine is cloudy or discoloured.
- Any part appears cracked or broken.
- It has been dropped. Part of the syringe may be broken even if you cannot see the break. Use a new syringe.
- The grey needle cap is missing or not securely attached.
- The expiration date printed on the label has passed.
In all cases, use a new prefilled syringe.
Wash your hands thoroughly with soap and water.
On a clean, well-lit work surface, place the:
- Prefilled syringe
- Alcohol wipe
- Cotton ball or gauze pad
- Adhesive bandage
- Sharps disposal container
Step 2 – Get ready
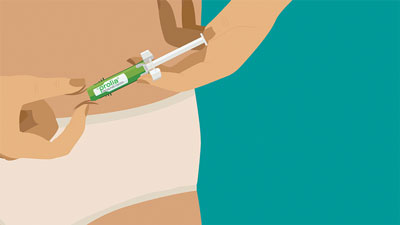
You can use:
- Upper thigh
- Stomach area (abdomen), except for a 5-cm (2-inch) area right around the navel (belly button)
- Outer area of upper arm
Clean the injection site with an alcohol wipe. Let the skin dry.
- Do NOT touch this area again before injecting.
- Do NOT inject into areas where the skin is tender, bruised, red or hard. Avoid injecting into areas with scars or stretch marks.

- Do NOT remove the grey needle cap from the prefilled syringe until you are ready to inject.
- Do NOT twist or bend the grey needle cap.
- Do NOT hold the prefilled syringe by the plunger rod.
- Do NOT put the grey needle cap back onto the prefilled syringe.
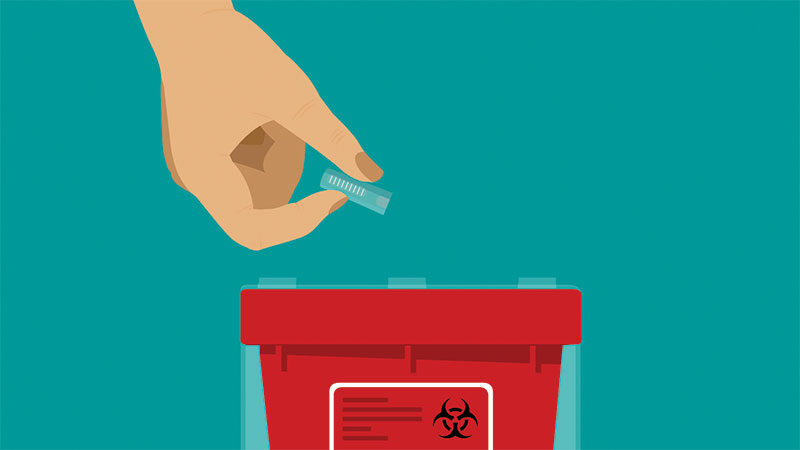
Important: Throw the grey needle cap into the sharps disposal container.
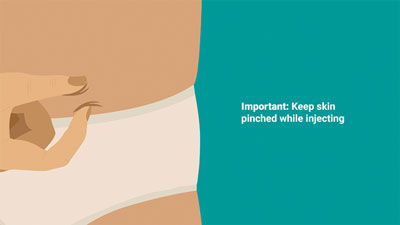
Step 3 – Subcutaneous (under the skin) injection
Important: Keep skin pinched while injecting.
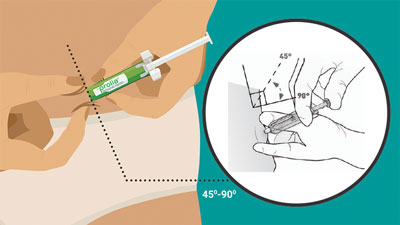
- Do NOT pull back the plunger rod while the needle is inserted.
When done, gently pull the syringe off of the skin.
Important: When you remove the syringe, if it looks like the medicine is still in the syringe barrel, this means a full dose has not been given.
Step 4: Finish
For your safety, pull the green safety guard until it clicks and covers the needle.
Once extended, the green safety guard will lock into position and will not slide back over the needle.
Keep your hands away from the needle at all times.
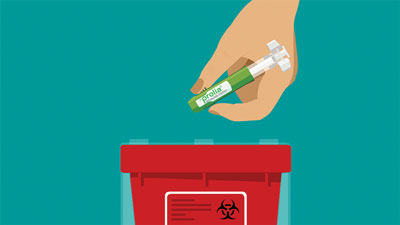
Put the used prefilled syringe in a sharps disposal container right away after use. Do NOT throw away (dispose of) the syringe in the trash.
If a sharps disposal container is not available, you may use a container that is:
- made of a heavy-duty plastic
- can be closed with a tight-fitting, puncture-resistant lid, without sharps being able to come out
- upright and stable during use
- leak-resistant, and
- properly labeled to warn of hazardous waste inside the container.
When the sharps disposal container is almost full, follow community guidelines for the right way to dispose of the sharps disposal container. There may be local laws about how to throw away used needles and syringes.
Do NOT reuse the prefilled syringe.
Do NOT recycle the prefilled syringe or sharps disposal container or throw them into the trash.
Important: Always keep the sharps disposal container out of the reach of children.
If there is blood, press a cotton ball or gauze pad on the injection site. Do NOT rub the injection site. Apply an adhesive bandage if needed.
Please refer to the Product Monograph for complete dosing and administration information.
Please click here for injection technique resources for patients
Prolia® Self Injection Step By Step GuideProlia® Self-Injection Video
References
| 1. | Amgen Canada Inc. Prolia® (denosumab injection) Product Monograph. November 24, 2023. |